expo 와 java spring boot [ 로그인 ] 24.07.24
이번에 프로젝트를 진행하면서 로그인 파트를 맡게 됐다. (왜지)
간단한 작업이라 생각을 했고 호기롭게 시작했지만 .. 은근 오래걸려 이거에 대해 정리 하는 시간을 가지려고 한다.
무엇보다 코딩이 지금 너무 오랜만이라 애 좀 먹었다 ..
## 프론트
Lpgin.js
import React, { useState } from "react";
import {
  View,
  Text,
  TextInput,
  TouchableOpacity,
  StyleSheet,
  Alert,
  SafeAreaView,
  Image,
} from "react-native";
import axios from "axios";

export default function Login({ navigation }) {
  const [username, setUsername] = useState("");
  const [password, setPassword] = useState("");

  const handleLogin = async () => {
    try {
      const response = await axios.post("http://10.67.76.63:8080/api/login", {
        username,
        password,
      });
      Alert.alert("Success", response.data);
      navigation.reset({
        index: 0,
        routes: [{ name: "BottomTabNavigator" }],
      });
    } catch (error) {
      console.error(error);
      Alert.alert("Error", "Login failed");
    }
  };

  const goToKakaoLogin = () => {
    navigation.navigate("kakaoLogin"); // "KakaoLogin"은 kakaologin.js 파일에서 export한 컴포넌트명입니다.
  };

  const goToNewLogin = () => {
    navigation.navigate("signUp"); // "signUp"은 회원가입 화면 컴포넌트명입니다.
  };

  const goToGoogleLogin = () => {
    navigation.navigate("googleLogin"); // "GoogleLogin"은 googlelogin.js 파일에서 export한 컴포넌트명입니다.
  };

  return (
    <View style={styles.container}>
      <Image
        source={require("../../assets/images/icon/Mainicon.png")}
        style={styles.image}
      />

      <TextInput
        style={styles.input}
        placeholder="Username"
        value={username}
        onChangeText={setUsername}
      />
      <TextInput
        style={styles.input}
        placeholder="Password"
        value={password}
        onChangeText={setPassword}
        secureTextEntry
      />

      <TouchableOpacity style={styles.button} onPress={handleLogin}>
        <Text style={styles.buttonText}>Login</Text>
      </TouchableOpacity>

      <SafeAreaView>
        <TouchableOpacity style={styles.signUpButton} onPress={goToNewLogin}>
          <Text style={styles.signUpButtonText}>회원가입</Text>
        </TouchableOpacity>

        <TouchableOpacity style={styles.kakaoButton} onPress={goToKakaoLogin}>
          <Text style={styles.kakaoButtonText}>카카오 로그인</Text>
        </TouchableOpacity>
        <TouchableOpacity style={styles.kakaoButton} onPress={goToGoogleLogin}>
          <Text style={styles.kakaoButtonText}>구글 로그인</Text>
        </TouchableOpacity>
      </SafeAreaView>
    </View>
  );
}

const styles = StyleSheet.create({
  container: {
    flex: 1,
    justifyContent: "center",
    backgroundColor: "#fff", // 배경 색을 흰색으로 설정
    padding: 20,
  },
  image: {
    width: 100, // 이미지 너비 조절
    height: 150, // 이미지 높이 조절
    alignSelf: "center",
    marginBottom: 40,
  },
  title: {
    fontSize: 24,
    fontWeight: "bold",
    marginBottom: 20,
    textAlign: "center",
  },
  input: {
    height: 40,
    borderColor: "#ccc",
    borderBottomWidth: 1,
    marginBottom: 15,
    paddingHorizontal: 10,
  },
  button: {
    backgroundColor: "#007BFF",
    paddingVertical: 15,
    borderRadius: 5,
  },
  buttonText: {
    color: "#fff",
    textAlign: "center",
    fontWeight: "bold",
  },
  signUpButton: {
    backgroundColor: "#fff",
    paddingVertical: 15,
    borderRadius: 5,
    marginTop: 10,
    borderWidth: 2,
    borderColor: "#007BFF",
  },
  signUpButtonText: {
    color: "#007BFF",
    textAlign: "center",
    fontWeight: "bold",
  },
  kakaoButton: {
    backgroundColor: "#FEE500",
    paddingVertical: 15,
    borderRadius: 5,
    marginTop: 10,
  },
  kakaoButtonText: {
    color: "#3C1E1E",
    textAlign: "center",
    fontWeight: "bold",
  },
});
회원가입
SignUp.js
import React, { useState } from "react";
import {
  View,
  Text,
  TextInput,
  TouchableOpacity,
  StyleSheet,
  Alert,
} from "react-native";
import axios from "axios";

export default function signUp({ navigation }) {
  const [username, setUsername] = useState("");
  const [email, setEmail] = useState("");
  const [password, setPassword] = useState("");
  const [confirmPassword, setConfirmPassword] = useState("");
  const [phonenumber, setPhoneNumber] = useState("");
  const code = "general";

  const handleSignUp = async () => {
    if (password !== confirmPassword) {
      Alert.alert("Error", "Passwords do not match");
      return;
    }

    try {
      const response = await axios.post("http://10.67.76.63:8080/register", {
        username,
        email,
        password,
        phonenumber,
        code,
      });
      Alert.alert("회원가입이 완료 됐습니다.", response.data);
      navigation.navigate("Login"); // 메인 화면으로 이동
    } catch (error) {
      console.error(error);
      Alert.alert("Error", "Sign up failed");
    }
  };

  return (
    <View style={styles.container}>
      <Text style={styles.title}>Sign Up</Text>
      <TextInput
        style={styles.input}
        placeholder="Username"
        value={username}
        onChangeText={setUsername}
      />
      <TextInput
        style={styles.input}
        placeholder="Email"
        value={email}
        onChangeText={setEmail}
        keyboardType="email-address"
        autoCapitalize="none"
      />
      <TextInput
        style={styles.input}
        placeholder="Password"
        value={password}
        onChangeText={setPassword}
        secureTextEntry
      />
      <TextInput
        style={styles.input}
        placeholder="Confirm Password"
        value={confirmPassword}
        onChangeText={setConfirmPassword}
        secureTextEntry
      />
      <TextInput
        style={styles.input}
        placeholder="PhoneNumber"
        value={phonenumber}
        onChangeText={setPhoneNumber}
      />
      <TouchableOpacity style={styles.button} onPress={handleSignUp}>
        <Text style={styles.buttonText}>Sign Up</Text>
      </TouchableOpacity>
    </View>
  );
}

const styles = StyleSheet.create({
  container: {
    flex: 1,
    padding: 20,
    justifyContent: "center",
    backgroundColor: "#fff", // 배경 색을 흰색으로 설정
  },
  title: {
    fontSize: 24,
    fontWeight: "bold",
    marginBottom: 20,
    textAlign: "center",
  },
  input: {
    height: 40,
    borderColor: "#ccc",
    borderBottomWidth: 1,
    marginBottom: 15,
    paddingHorizontal: 10,
  },
  button: {
    backgroundColor: "#007BFF",
    paddingVertical: 15,
    borderRadius: 5,
  },
  buttonText: {
    color: "#fff",
    textAlign: "center",
    fontWeight: "bold",
  },
});
백엔드
백엔드는 개발자 유미보고 구현했다.
https://www.youtube.com/watch?v=B03OoUVgVIA&list=PLJkjrxxiBSFCKD9TRKDYn7IE96K2u3C3U&index=6
여기서 이해가 잘된 도식화가 있길래 가져와본다.
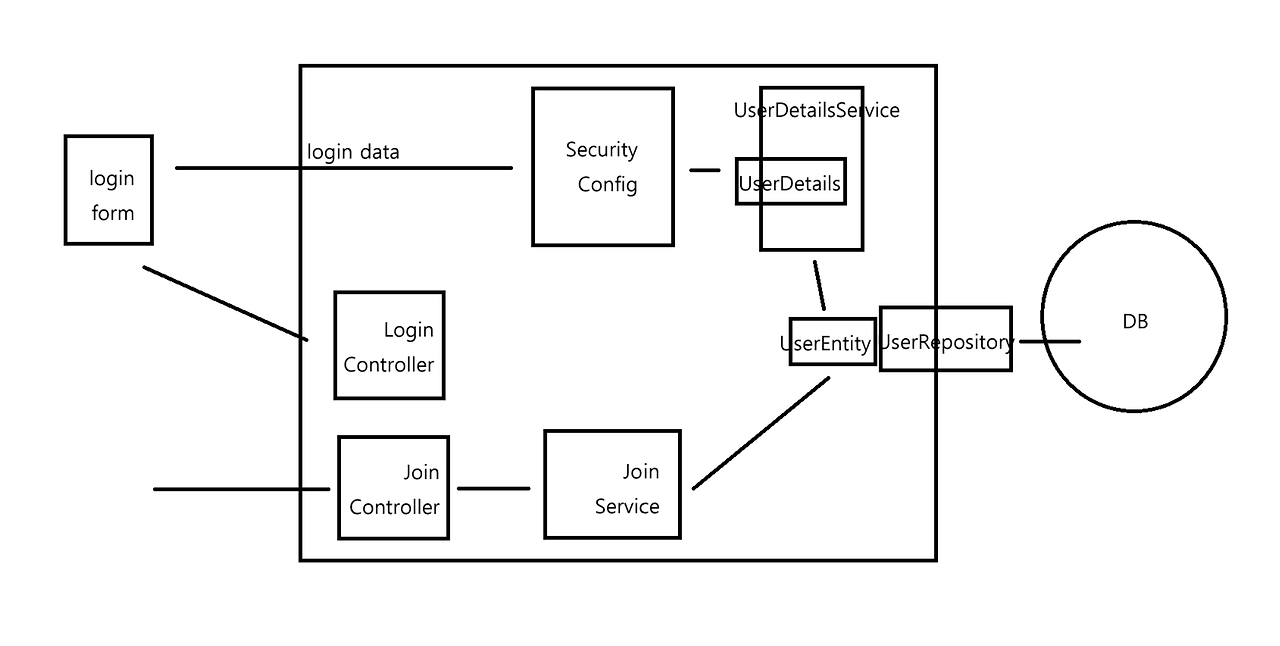
회원가입할 때 쓰이는 도식화이다.
UserDetails 란?
Spring Security에서 사용자의 정보를 담는 인터페이스이다.
CustomUserDeatils
대부분의 경우 Spring Security의 기본 UserDetails로는 실무에서 필요한 정보를 모두 담을 수 없기에 아래와 같은 CustomUserDeatils 를 구현하여 사용한다.
UserDetailsService 란?
Spring Security에서 유저의 정보를 가져오는 인터페이스이다.
CustomUserDetailsService 란?
UserDetailsService 인터페이스를 상속받아 쓸 때 해당 함수를 구현을 한다 .
1. SecurityConfig ( 파일 )
-> admin이 없어서 해당 내용은 제외하고 구성했다.
package dac2dac.doctect.common.config;

import org.springframework.security.config.annotation.web.configurers.CsrfConfigurer;
import org.springframework.context.annotation.Bean;
import org.springframework.context.annotation.Configuration;
import org.springframework.security.config.annotation.web.builders.HttpSecurity;

import org.springframework.security.config.annotation.web.configuration.EnableWebSecurity;
import org.springframework.security.config.annotation.web.configurers.AbstractHttpConfigurer;
import org.springframework.security.config.http.SessionCreationPolicy;
import org.springframework.security.crypto.bcrypt.BCryptPasswordEncoder;
import org.springframework.security.crypto.password.PasswordEncoder;
import org.springframework.security.web.SecurityFilterChain;


@Configuration
@EnableWebSecurity
public class SecurityConfig {


    @Bean
    public SecurityFilterChain filterChain(HttpSecurity http) throws Exception {
        http
                .csrf(CsrfConfigurer::disable)
               // 로그인
                .formLogin(formLogin-> {
                    formLogin.loginPage("/api/login/")
                            .loginProcessingUrl("/api/login/") // /login에 접속하면 시큐리티가 낚아채서 login 진행
                            // 컨트롤러에 /login 안만들어도 된다.
                            .defaultSuccessUrl("/");
                })
                .rememberMe(AbstractHttpConfigurer::disable)
                .httpBasic(AbstractHttpConfigurer::disable)
                .sessionManagement(session -> session.sessionCreationPolicy(SessionCreationPolicy.STATELESS));

        return http.build();
    }

    @Bean
    public PasswordEncoder passwordEncoder() {
        return new BCryptPasswordEncoder();
    }


}
2. BCrypt 암호화 메소드
비밀번호 암호화하여 저장하기
package dac2dac.doctect.user.controller;

import dac2dac.doctect.user.dto.UserDTO;
import dac2dac.doctect.user.service.UserService;
import io.swagger.v3.oas.annotations.tags.Tag;
import org.springframework.beans.factory.annotation.Autowired;
import org.springframework.http.ResponseEntity;
import org.springframework.web.bind.annotation.*;
import org.slf4j.Logger;
import org.slf4j.LoggerFactory;

@Tag(name = "유저", description = "회원가입")
@RestController
@CrossOrigin(origins = "http://10.67.76.33:8081") // Expo 개발 서버 주소
public class LoginController {

    @Autowired
    private UserService userService;

    private static final Logger logger = LoggerFactory.getLogger(LoginController.class);

    @PostMapping("/register")
    public ResponseEntity<String> registerUser(@RequestBody UserDTO userDTO) {
        try {
            userService.registerUser(
                    userDTO.getUsername(),
                    userDTO.getEmail(),
                    userDTO.getPassword(),
                    userDTO.getPhoneNumber(),
                    userDTO.getCode()
            );
            return ResponseEntity.ok("Registration successful!!");
        } catch (Exception e) {
            logger.error("Error during registration: {}", e.getMessage(), e);
            return ResponseEntity.badRequest().body("Registration failed: " + e.getMessage());
        }
    }

    @PostMapping("/api/login")
    public ResponseEntity<String> loginUser(@RequestBody UserDTO userDTO) {
        //System.out.println("loginUser 호출됨"); // 로그 추가
        try {
            boolean isAuthenticated = userService.authenticateUser(
                    userDTO.getUsername(),
                    userDTO.getPassword()
            );
            if (isAuthenticated) {
                // JWT Token 생성하기
                //String token = jwtUtility.generateToken(userDTO.getUsername());
                //ResponseEntity.ok(token);
                return ResponseEntity.ok("Login successful");
            } else {
                return ResponseEntity.status(401).body("Invalid2 username or password");
            }
        } catch (Exception e) {
            logger.error("Error during login: {}", e.getMessage(), e);
            return ResponseEntity.status(500).body("Login failed::: " + e.getMessage());
        }
    }
}
3. CustomUserDetails Service
package dac2dac.doctect.user.service;

import dac2dac.doctect.user.dto.CustomUserDetails;
import dac2dac.doctect.user.entity.User;
import dac2dac.doctect.user.repository.UserRepository;

import org.springframework.beans.factory.annotation.Autowired;
import org.springframework.security.core.userdetails.UserDetails;
import org.springframework.security.core.userdetails.UserDetailsService;
import org.springframework.security.core.userdetails.UsernameNotFoundException;
import org.springframework.stereotype.Service;


import java.util.ArrayList;

@Service
public class CustomUserDetailsService implements UserDetailsService {

    private final UserRepository userRepository;


    @Autowired
    public CustomUserDetailsService(UserRepository userRepository) {
        this.userRepository = userRepository;
    }

    @Override
    public UserDetails loadUserByUsername(String username) throws UsernameNotFoundException {
        User user = userRepository.findByUsername(username);
        if (user!= null) {
            return new CustomUserDetails(user);
        }
        // 사용자 정보를 찾지 못한 경우 UsernameNotFoundException을 던집니다.
        throw new UsernameNotFoundException("User not found with username: " + username);

    }
}
3. CustomUserDetails
package dac2dac.doctect.user.dto;

import dac2dac.doctect.user.entity.User;
import org.springframework.security.core.GrantedAuthority;
import org.springframework.security.core.userdetails.UserDetails;

import java.util.ArrayList;
import java.util.Collection;
import java.util.List;

public class CustomUserDetails implements UserDetails {

    private User user;

    public CustomUserDetails(User user) {
        this.user = user;
    }
    @Override
    public Collection<? extends GrantedAuthority> getAuthorities() {

        return List.of();
    }

    @Override
    public String getPassword() {
        return user.getPassword();
    }

    @Override
    public String getUsername() {
        return user.getUsername();
    }


    @Override
    public boolean isAccountNonExpired() {
        return false;
    }

    @Override
    public boolean isAccountNonLocked() {
        return false;
    }

    @Override
    public boolean isCredentialsNonExpired() {
        return false;
    }

    @Override
    public boolean isEnabled() {
        return false;
    }
}
화면은 다음과 같다.
=> 조만간 JWT 토큰까지 구현하여 업데이트 하겠다.